在开发 WPF 应用程序时,在列表中展示相关图片是一个很常见的需求。比如,在列表中展示用户的虚拟头像:如果每页显示 100 条数据的话,那么就需要加载一百张图片到内存里。很显然这不会出什么问题,一般情况下用户的图像都不会太大。
但如果换个场景,比如订单列表或者产品列表就不太合适了。为了获得更好的销售效果,产品图一般都会很大。加载这样一个列表就会占用大量的内存。
其中一个解决方式是:在加载到界面之前就为图片生成好缩略图。这项工作可以由后端服务器完成或者编写一个自定义的转换器来搞定。
事实上,WPF 中内置了一个很有意思的 DecodePixelWidth 属性可以轻松的将位图作为缩略图加载以达到节省应用程序内存的目的。
<!-- Simple image rendering. However, rendering an image this way may not
     result in the best use of application memory. See markup below which
     creates the same end result but using less memory. -->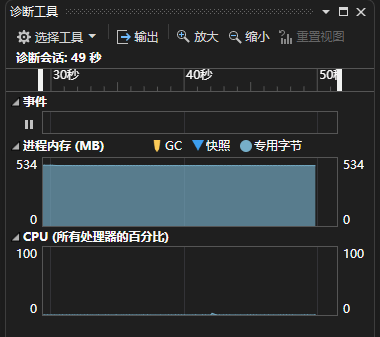
<Image Width="200" Source="Sample.jpg"/>其中,Sample.jpg 是一张分辨率为 7360 x 4912 的图片。启动后的程序内存占用 534 MB。
使用以下代码设置 DecodePixelWidth 属性:
<Image Width="200">
  <Image.Source>
    <!-- To save significant application memory, set the DecodePixelWidth or
     DecodePixelHeight of the BitmapImage value of the image source to the desired
     height and width of the rendered image. If you don't do this, the application will
     cache the image as though it were rendered as its normal size rather than just
     the size that is displayed. -->
    <!-- Note: In order to preserve aspect ratio, only set either DecodePixelWidth
         or DecodePixelHeight but not both. -->
    <BitmapImage DecodePixelWidth="200" UriSource="Sample.jpg" />
  </Image.Source>
</Image>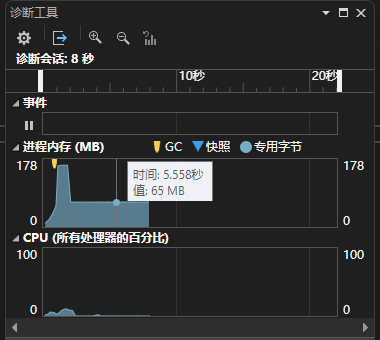
内存占用降低为 65 MB,效果非常明显。
以上代码来自微软官方文档,链接地址:如何:将图像作为缩略图加载 。